Remote File Transfer is a utility program that can be used to open a document file (Excel, Word, PDF, etc) on client side from a RemoteApp / Citrix XenApp session. It transfers the file from the server (Citrix or Remote Desktop Services ) to the client (local) machine, then opens the file. Document file can be transfered (copied) only from the server to local PC within its remote session. There is no security risk to send file to machine other than the current connected local PC.
This program can be used for these purposes:
- Open a document file (PDF, Word, Excel, etc) with default associated program on the local/client machine (file is on the remote server)
- Print a file on the default printer installed on local machine.
- Attach file(s) to a new Outlook email on local machine like Send to Mail recipient
- from MS Word via a macro, provide Send document as attachment to mail client on local machine
- RemoteApp ERP programs like Microsoft Dynamic, SAP, Cosgnos reporting server can export to Excel / PDF and open file on the local machine
- Run on latest Windows 10 - 11 / Server 2008 - 2025 RemoteApp
- New! Sep 2024: support Snapdragon X ARM based Windows 11 Copilot+PC devices
This program can be also configured to provide Content Redirection feature like with Citrix XenApp for any type of file.
For example, from an Outlook email, when double clicking on an MS Word or PDF attached file, the file will be transferred to local machine and opened with the default associated program.
Notes: for Citrix, the FREEWARE version of Remote File Transfer works only with Windows 2008/R2 and previous versions. A commercial version with no limit is available. Send an email to request a demo version.
USING
From a remote session, on the Citrix or Remote Desktop Server, open a DOS command prompt and type:
RemFileTransfer.exe "c:\my documents\MyWordFile.doc"
The file c:\my documents\MyWordFile.doc on the server will be copied to %TEMP% folder on local machine and opened with the default associated program.
The complete syntax option of Remote File Transfer is:
RemFileTransfer.exe /S:SourceFileOnServer /D:DestinationFolder /O:Operation
Where:
SourceFileOnServer: The full path file name on the server to copy to client side
DestinationFolder: Optional - a folder on the client machine where the file will be copied to. If DestinationFolder is omitted, the file will be transferred to %TEMP% folder on the local machine.
Operation: Optional – can be one of these values:
T: Transfer file from server to local only, do not open.
O: Open the file with the default associated program after transferring. This is the default option if the parameter is omitted.
P: Print the document file on default printer attached to local machine
M: Attach file to a new Outlook email on the local machine (like Send To Mail Recipient context menu)
Example: from a DOS Command line type:
RemFileTransfer.exe /S:C:\Temp\PictureTest.jpg /D:C:\Temp\ /O:O
The file C:\Temp\PictureTest.jpg on Terminal Server will be copied to C:\Temp\ on the client (local) machine. The file will be opened in default Image Viewer on the local machine.
DestinationFolder can be an environment variable on the client machine, but it must be used with ^ escape character, e.g:
RemFileTransfer.exe /S:C:\PictureTest.jpg /D:^%USERPROFILE^%\Temp\ /O:O
Except O(pen), options T(ransfer), P(rint) and M(ail), multiple files can be used. File name must be separated by a semi colon. e.g:
RemFileTransfer.exe /S:C:\File1.doc;C:\File2.doc /O:M
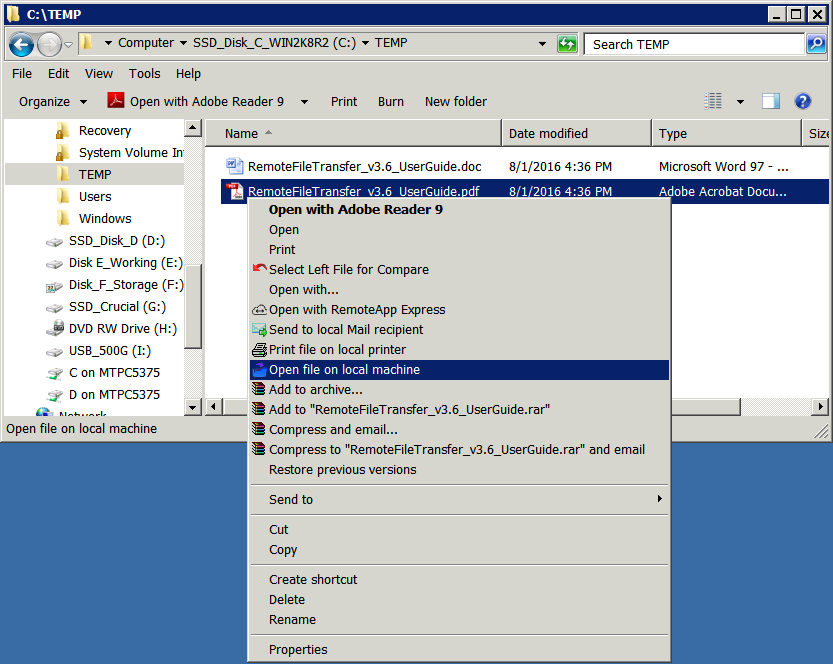
On the server, there are 3 commands added to Windows Explorer context menu. When right click on a file, user will have option to Send the file to attach to local Outlook email (Send to local Mail recipient) or to Print the file on default printer installed on local machine or Open the file on local machine.
CONTENT REDIRECTION CONFIGURATION
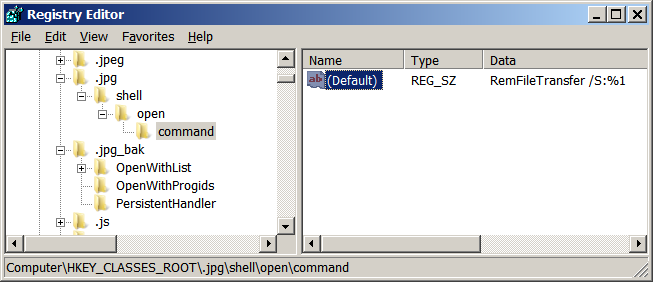
If you want to configure RemFileTransfer.exe for using as Server-to-Client redirection for some file types (as with Citrix), Ex: for .jpg JPEG picture file type, follow these steps:
- Use Regedit.exe to edit the registry.
WARNING: IF YOU ARE NOT SURE ABOUT THIS, DON'T DO IT.
- Find HKEY_CLASSES_ROOT\.jpg and rename it to HKEY_CLASSES_ROOT\.jpg_bak
- Recreate the key HKEY_CLASSES_ROOT\.jpg
- Add the new keys HKEY_CLASSES_ROOT\.jpg\shell\open\command
- Edit the default value, change it to:
C:\Program Files (x86)\MQTechnologies\RemoteFileTransfer\RemFileTransfer.exe %1
If you want to specify a destination folder on the local machine:
C:\Program Files (x86)\MQTechnologies\RemoteFileTransfer\RemFileTransfer.exe /S:%1 /D:FolderOnLocal
In the registry, if using Environment Variable, use ^ escape character:
C:\Program Files (x86)\MQTechnologies\RemoteFileTransfer\RemFileTransfer.exe /S:%1 /D:^%USERPROFILE^%
From now, during a remote session (RDP) every time when you double click on a JPEG picture file, it will be transferred to and opened on the client machine using the default associated program on the client side.
With this configuration, inside Outlook, when you double click on a Jpeg attached file, that file will be transferred and opened on the client machine as well.
Repeat the same steps for any type of document file that you want as .doc, .xls, .pdf, etc.
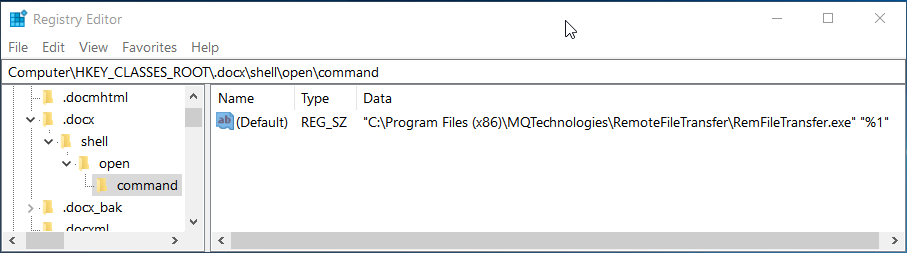
* For .DOCX extension
There are 2 places to modify in the server registry:
HKEY_CLASS_ROOT\.docx and
HKEY_CLASS_ROOT\docxfile
Rename (don’t edit) them to:
HKEY_CLASS_ROOT\.docx_bak
HKEY_CLASS_ROOT\docxfile_bak
Then recreate the same registry keys:
HKEY_CLASS_ROOT\.docx\shell\open\command
HKEY_CLASS_ROOT\docxfile\shell\open\command
and set Default value to: C:\Program Files (x86)\MQTechnologies\RemoteFileTransfer\RemFileTransfer.exe “%1”
* For .XLSX extension
Modify or create HKEY_CLASS_ROOT\.xlsx\shell\open\command
Default="C:\Program Files (x86)\MQTechnologies\RemoteFileTransfer\RemFileTransfer.exe" "%1"